1 Introduction
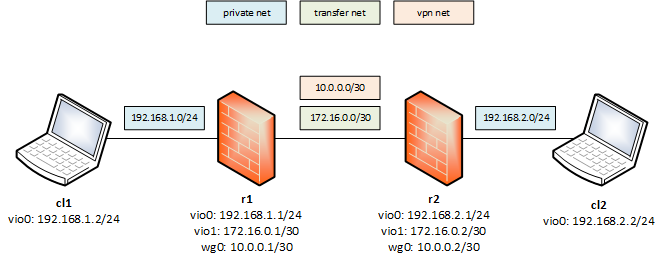
In this scenario we have two clients cl1 and cl2 in different layer 3 networks. In each of this networks is a firewall/router (r1 and r2), which we'll use for the connection via a virtual private network using WireGuard. There is a transfer net172.16.0.0/30 between the two routers, which is only used for WireGuard communication. The transfer net for secure communication (and routing) over the vpn is 10.0.0.0/30.
2 Configuration
2.1 Clients
The client configuration is very simple, only a basic network configuration is needed. I'll only cover the configuration of cl1, but it is basicly the same for cl2 (other ip and gateway addresses, see the picture above). The network interface isvio0, because I used virtual machines for this setup.
Network configuration file /etc/hostname.vio0:
inet 192.168.1.2/24Gateway address file
/etc/mygate:
192.168.1.1And activate the configuration:
# sh /etc/netstart vio0
# route -n add default 192.168.1.1
2.2 Routers
The machines r1 and r2 must act as routers, so they shouldn't drop ip packages which are not addressed directly to them:
# echo "net.inet.ip.forwarding=1" >> /etc/sysctl.conf
# sysctl net.inet.ip.forwarding=1
2.2.1 r1
First we need to create the public (r1.pub) and private (r1.key) keys for the communication. We'll also use a pre shared key (psk.key) for post-quantum resistance.
# openssl rand -base64 32 > r1.key
# openssl rand -base64 32 > psk.key
# ifconfig wg0 create wgkey `cat r1.key`
# ifconfig wg0 | grep pubkey | cut -d ' ' -f 2 > r1.pub
Now copy the pre shared key to r2, e.g. by using SSH:
# scp psk.key 172.16.0.2:Create the network configuration file
/etc/hostname.wg0 for WireGuard:
wgkey <r1 private key>
wgport 5000
wgpeer <r2 public key> \
wgpsk <pre shared key> \
wgaip 10.0.0.2/32 \
wgaip 192.168.1.0/24 \
wgaip 192.168.2.0/24 \
wgpka 60
inet 10.0.0.1/30
!route -n add 192.168.2.0/24 10.0.0.2
NOTE: You need to replace the parts in angle brackets (<>) with the content of the correspondending file, e.g. <r1 private key> with the content of r1.key!
Little explanation: wpkey is the own private key of r1, wgport is the udp port on which the WireGuard server is listening, wgpeer identifies the peer via its public key (here r2.pub), wgpsk is the pre shared secret key (psk.key), wgaip or "WireGuard allowed ip" is WireGuard's own firewall, which drops packages of host and networks which are not mentioned here. If you just want to let all packets pass, use 0.0.0.0/0. WireGuard peer/please keep alive (wgpka) sends keep alive packages in the given interval in seconds. In the last line we set the static route for the 192.168.2.0/24 network via the gateway 10.0.0.2 (routing address of r2).
Now activate and verify the configuration:
# sh /etc/netstart wg0
# ifconfig wg0
We'll now configure the packet filter (
pf) via /etc/pf.conf:
set skip on lo
pass in quick on vio1 proto udp from 172.16.0.2 to 172.16.0.1 port 5000
pass quick on wg0
pass quick on vio0
block quick all
On the external interface
vio1 only the WireGuard connection from peer r2 on port 5000 is allowed. Packets from the internal vio0 interface and packets over the vpn interface wg0 are always allowed. Everything else is blocked.
Let's activate and verify the packet filter rules:
# pfctl -f /etc/pf.conf
# pfctl -sr
2.2.2 r2
The configuration of r2 is basicly the same as r1, with some minor exceptions. First we'll need the WireGuard configuration /etc/hostname.wg0:
wgkey <r2 private key>
wgpeer <r1 public key> \
wgpsk <pre shared key> \
wgendpoint 172.16.0.1 5000 \
wgaip 10.0.0.1/32 \
wgaip 192.168.1.0/24 \
wgaip 192.168.2.0/24 \
wgpka 60
inet 10.0.0.2/30
!route -n add 192.168.1.0/24 10.0.0.1
!ping -q -c 1 10.0.0.1 > /dev/null
Instead of
wgport we need the wgendpoint configuration option, which points to 172.16.0.1:5000 (r1).
Activate and verify:
# sh /etc/netstart wg0
# ping 10.0.0.1
# ifconfig wg0
You should see successful pings. Also check the
Rx: / Tx: fields in the ifconfig output, which should show a value greater than zero. Now for the packet filter configuration /etc/pf.conf:
set skip on lo
pass out quick on vio1 proto udp to 172.16.0.1 port 5000
pass quick on wg0
pass quick on vio0
block quick all
Here only outgoing udp traffic on
vio1 to r1's WireGuard port 5000 is allowed. Activate and verfiy:
# pfctl -f /etc/pf.conf
# pfctl -sr
3 Debug
Some notes on debugging, see the man pages for more information:
- WireGuard:
# ifconfig wg0 debug
# dmesg | tail
# ifconfig wg0 -debug
- Packet filter:
# pfctl -sr
# pfctl -d
- Routing:
# route -n show -inet
# traceroute 192.168.2.2
- Interface:
# tcpdump -nvi vio0